Pipeline Timeline
A horizontal stepper runs across the top of the Document Details page, showing every stage of the processing pipeline: Upload → Extract → Match → Validation → Action → Writeback Each stage node displays whether it completed successfully, is currently running, or encountered an error. If the document is still being processed, the timeline auto-refreshes every two seconds so you always see live progress without reloading the page. Click any completed stage node to jump directly to that stage’s data in the Raw Pipeline tab.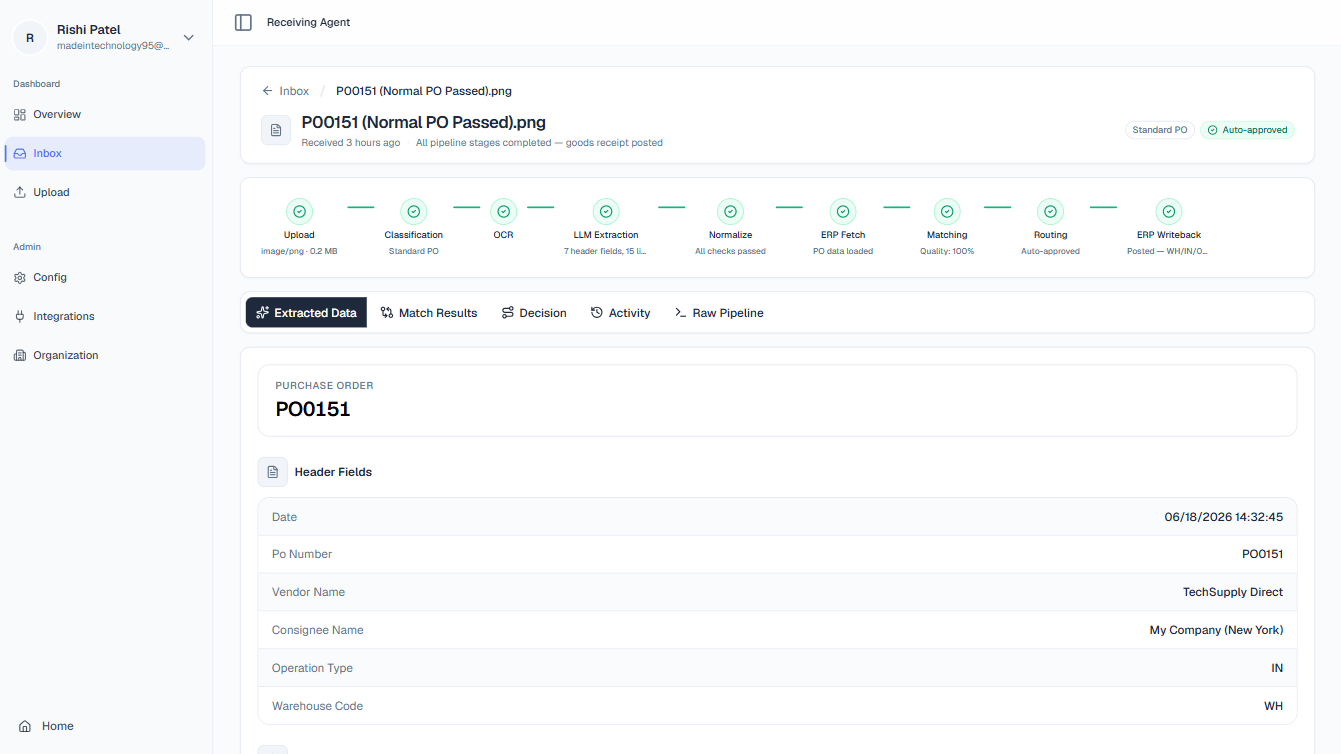
The Five Tabs
Extracted Data
Extracted Data
The Extracted Data tab shows exactly what the AI read from the physical or digital document: no comparison, no interpretation, just the raw output of the extraction stage.Header fields include information like PO Number, Vendor Name, Invoice Date, Ship Date, and any other top-level fields found on the document.Line items are displayed in a table with one row per product line: item description, part number, quantity, unit of measure, and unit price where available.Think of this tab as the answer to: “What does the paper actually say?” If a value looks wrong here, the AI misread the source document, you can correct it in the Match Results tab.
Match Results
Match Results
The Match Results tab shows a side-by-side comparison of what the AI extracted from the document (left column) versus what your ERP has on record for the matched purchase order (right column).Lines where the values agree are displayed normally. Lines where there is a discrepancy, for example, the packing slip says quantity 50 but the PO shows quantity 40, are highlighted in amber to draw your attention immediately.When the document status is “Needs Review”, the extracted-value fields become editable. Click any highlighted quantity or field value to enter a correction. Use this to fix genuine AI misreads (for example, the AI read “50” as SO instead of five-zero) or to accept a partial shipment amount that differs from the PO. All corrections are staged and do not take effect until you click Approve. If you have made edits, the Approve button label updates to Approve (X edited) so you always know corrections are pending.
Decision
Decision
The Decision tab explains the routing logic the AI applied to this document, specifically, why it was sent to human review rather than auto-approved.The tab displays the rule or condition that triggered the escalation, in plain language. For example:
- “Routed to Human Review because Line 2 quantity (50) exceeds ERP ordered quantity (40).”
- “Routed to Human Review because extraction confidence for PO Number field is below threshold (62%).”
- “No matching purchase order found for vendor SKU 1042-B.”
Activity
Activity
The Activity tab is a full, timestamped audit trail for the document. Every significant event is recorded here in chronological order, including:
- When the document was uploaded and by whom
- When each pipeline stage (extraction, matching, validation) completed
- When the ERP was queried for the matching purchase order
- Any inline corrections made during review, and by whom
- When an approve or reject decision was made, by whom, and (for rejections) the reason selected
Raw Pipeline
Raw Pipeline
The Raw Pipeline tab displays the full JSON output produced by each stage of the AI pipeline. It is intended for technical users: developers, integration engineers, or administrators who need to debug unexpected extraction results or validate pipeline behavior.Each pipeline stage has its own expandable JSON block. You can also click a stage node in the Pipeline Timeline at the top of the page to jump directly to that stage’s JSON output within this tab.If you are not troubleshooting a technical issue, you can safely ignore this tab.
Approving a Document
Use the steps below when the AI has routed a document to Needs Review and you have determined that it should be accepted and posted to your ERP.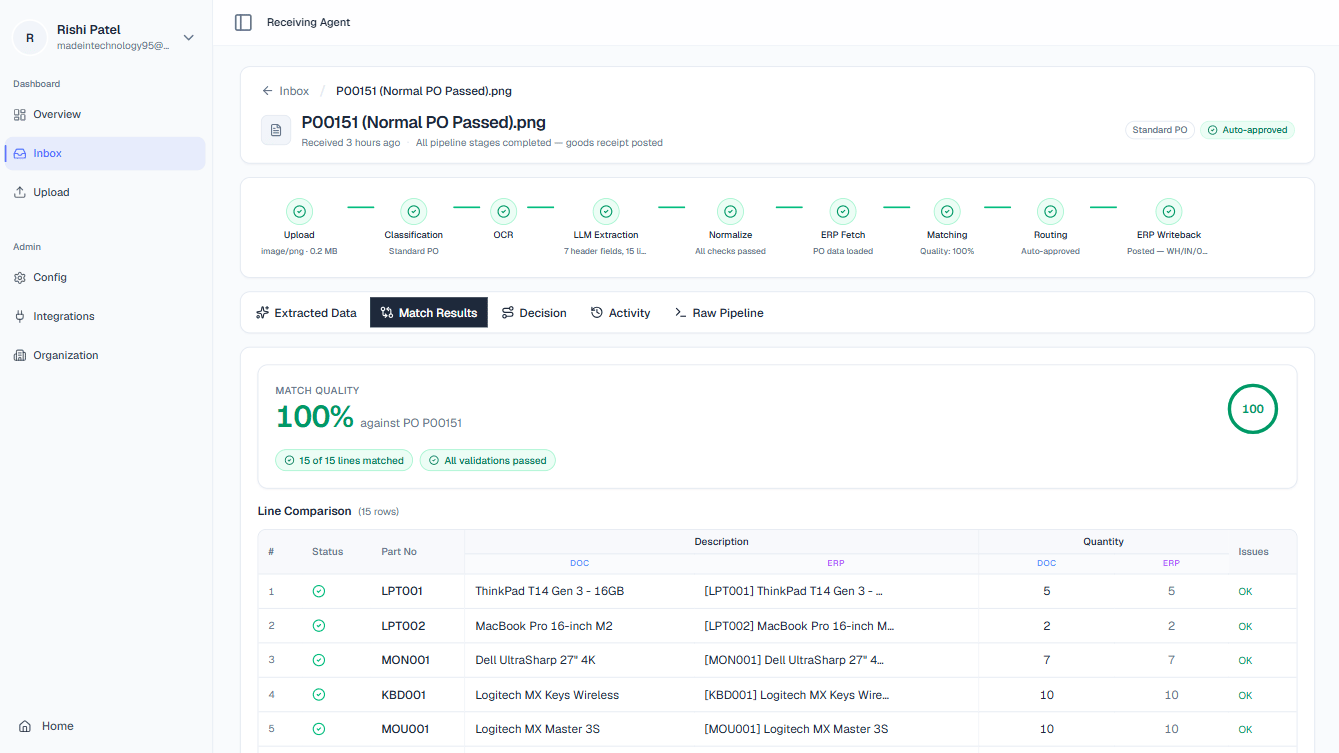
1
Review highlighted discrepancies in Match Results
Open the Match Results tab. Scan the highlighted lines to understand where the extracted values differ from ERP expectations. Cross-reference with the Decision tab if you are unsure why the document was flagged.
2
Correct any AI misreads (optional)
If a discrepancy is the result of the AI misreading the source document, for example, it extracted a quantity of 5 when the slip clearly shows 50, click the field to make it editable and type the correct value. You can correct as many fields as needed. The Approve button will display Approve (X edited) to confirm your changes are staged.If the discrepancy reflects a genuine partial shipment or a vendor variance that you are accepting, leave the extracted values as-is and proceed.
3
Confirm required fields are populated
The Approve button is disabled if any required fields (such as PO Number or total quantity) are blank. If the button appears greyed out, check the Extracted Data and Match Results tabs for empty required fields and fill them in before proceeding.
4
Click Approve to post the goods receipt
Click Approve (or Approve (X edited) if you made corrections). The platform immediately posts a goods receipt to your ERP using the confirmed values. The document status updates to Approved, the Pipeline Timeline advances to Writeback, and the event is logged in the Activity tab with your name and timestamp.
Rejecting a Document
Use the steps below when a document cannot be accepted, for example, it is illegible, is not a packing slip, or contains a discrepancy severe enough that the shipment should not be received.1
Click Reject
Click the Reject button on the Document Details page. A confirmation dialog will appear.
2
Select a rejection reason
Choose one of the following reasons from the dropdown:
- Illegible Document — the scan or photo quality is too poor to process reliably
- Not a Packing Slip — the document is an invoice, bill of lading, or other non-qualifying document type
- Duplicate — this document has already been received and processed under a different upload
- Critical Mismatch — the discrepancy between the packing slip and the PO is too significant to accept (e.g., wrong vendor, completely different items)
3
Confirm the rejection
Click Confirm Reject in the dialog. The document is permanently marked Rejected, removed from the active review queue, and the decision is recorded in the Activity tab with your name, timestamp, and reason.